Gaussian Glow
Introduction
The Gaussian Glow plug-in is a solid example of putting the techniques we’ve discussed into practice. At first glance, the stand-alone version can look intimidating, it’s close to 1,000 lines of code!
That larger version includes all required library functions inline. But the local version I use for testing and modifications is only 300 lines. Of those, the high-level function, the one that “runs the show”, is just 17 lines long.
This means roughly 70% of the code is shared utility logic that’s stable and doesn’t change often. So when I revisit the plug-in to fix a bug or add a feature, I can quickly scan those 17 lines to get a clear sense of how the plug-in works.
Here’s a look at the top-level function of the Gaussian Glow plug-in:
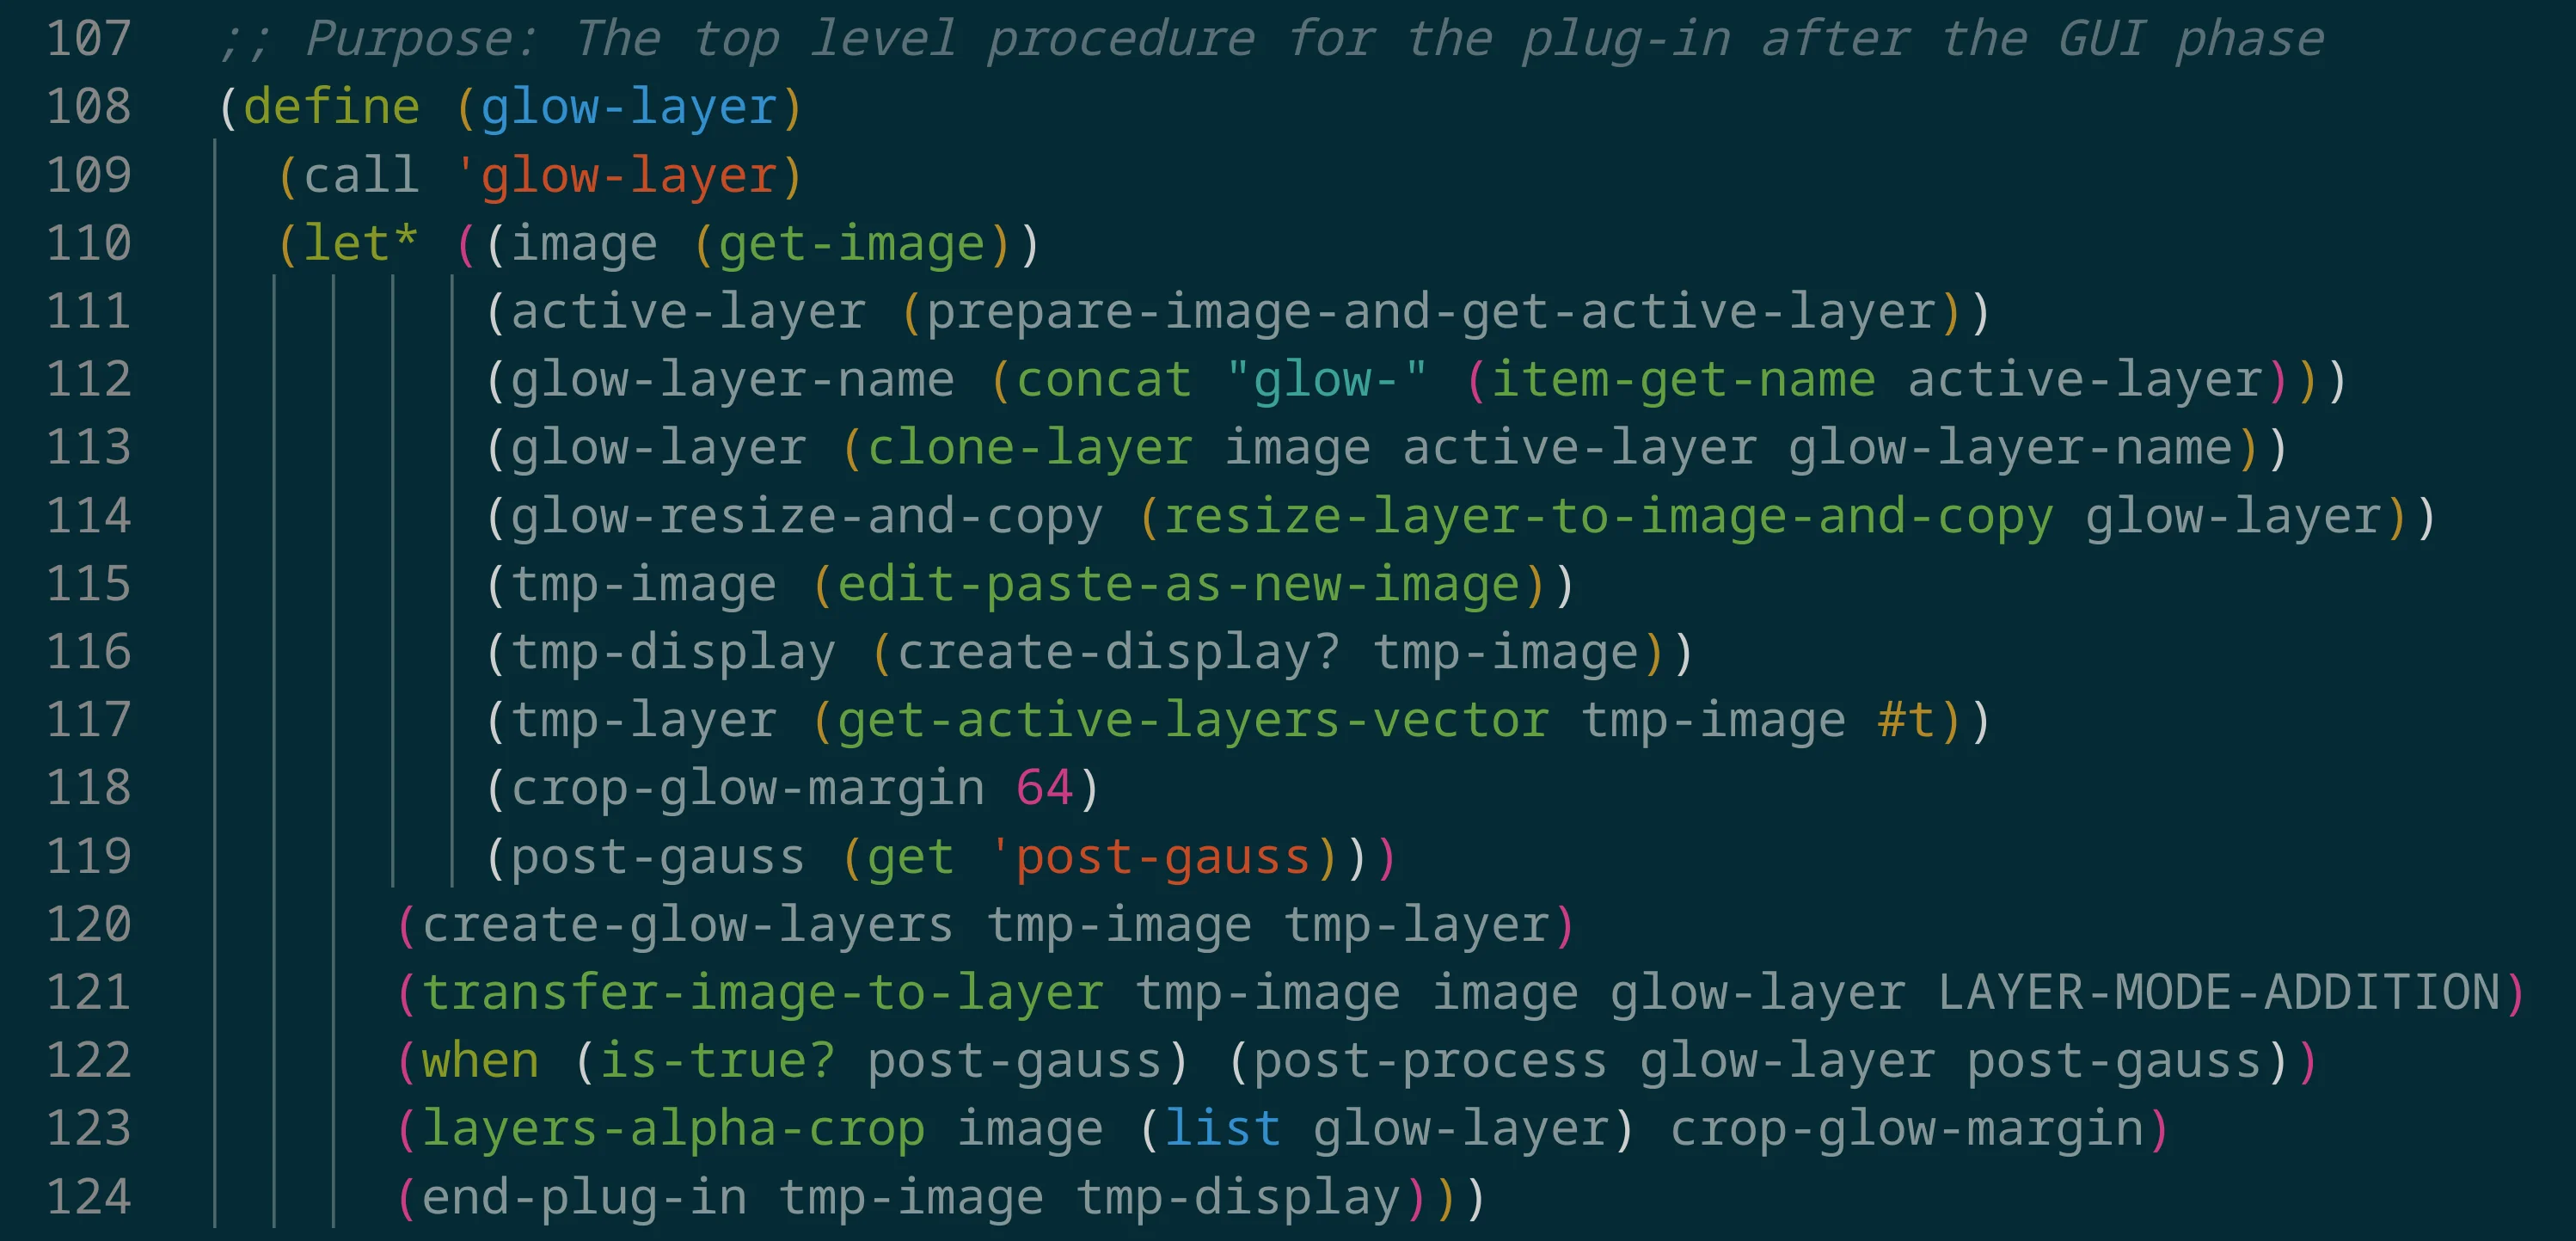
Even if you’re new to Script-Fu, this top-level logic is fairly readable, each line is practically self-documenting. Here’s what happens, step by step:
- Get the image and the active layer
- Duplicate the active layer, resize it and copy it to the buffer
- Paste the copied layer into a new image, optionally showing it in a display
- Grab the active layer from the new image
- Create glow layers
- Transfer the final result back into the original image as a new layer
- Optionally apply post-processing
- Crop the result using a specified margin
GUI Parameters Technique
When working with a more complex plug-in, like this one, which involves many input parameters, I’ve found it helpful to package those parameters into a global associative list.
I declare the list in my library file common.scm like so:
(define config '())The list is populated immediately after the registered Script-Fu function parameter list
(define (script-fu-glow-layer image drawables
                              pass-count
                              initial-opacity
                              final-opacity
                              opacity-exponent
                              final-gauss
                              gauss-exponent
                              final-spread
                              spread-exponent
                              post-gauss
                              keep-construction
                              show-info)
  ;; Populate the global `config` alist with these GUI parameters for easy passing
  (set! config
    `((image . ,image)
      (drawables . ,drawables)
      (pass-count . ,pass-count)
      (initial-opacity . ,initial-opacity)
      (final-opacity . ,final-opacity)
      (opacity-exponent . ,opacity-exponent)
      (final-gauss . ,final-gauss)
      (gauss-exponent . ,gauss-exponent)
      (final-spread . ,final-spread)
      (spread-exponent . ,spread-exponent)
      (post-gauss . ,post-gauss)
      (keep-construction . ,keep-construction)
      (show-info . ,show-info)))
      ...
This approach allows any local function within the script to access the GUI parameters directly. It eliminates the need to pass them down through multiple layers of function calls, making the code cleaner and easier to maintain.
As a bonus feature, when I’m running in debug mode, I output the parameter value to the Error Console each time I get it from the associative list. This makes it much easier to trace how values are being used and catch unexpected behavior during development.
A custom made get function added to my common.scm
;; Purpose: Returns the value from a global config alist pair if the parameter exists,
;;          otherwise returns a special "not found" marker.
(define (get parameter)
  (let ((result (assoc parameter config)))
    (if result
      (begin
        (when debug (message "> " parameter " : " (cdr result)))
        (cdr result))
        'not-found))) ;; Use a distinct value to indicate "not found"
An example of using the get function to fetch a GUI parameter from the global alist.
(define (calculate-glow-params i pass-count initial-gauss)
  (let* ((initial-spread  (* initial-gauss 0.5))
         (initial-opacity (get 'initial-opacity))
         (final-opacity   (get 'final-opacity))
         (final-gauss     (get 'final-gauss))
         (final-spread    (get 'final-spread))
         (opacity-exp     (get 'opacity-exponent))
         (gauss-exp       (get 'gauss-exponent))
         (spread-exp      (get 'spread-exponent))
         ...
Debug Mode
The plug-in includes a debug mode, which is a simple and effective way to print diagnostic information during development. You can enable it by setting a flag to true.
To turn on debug mode, modify the following line in glow-layer.scm:
;; Global variables
(define debug #f)
Change it to:
;; Global variables
(define debug #t)
Save the file and the next time you run the plug-in, you’ll see a steady stream of output in the Error Console.
Note: In GIMP, this console output will be cluttered with Warnings!, which can be distracting. However, in Artbox, I’ve customized the environment to remove that noise, making the debug output much more pleasant to read.
Example debug output in Artbox:
* (convert-gui-settings)
> keep-construction : 0
> show-info : 0
* (glow-layer)
* (prepare-image-and-get-active-layer)
> drawables : #(4)
> edit-copy glow-glow-stars
* (create-display?)
> post-gauss : 0.75
* (create-glow-layers)
> pass-count : 3
* (calculate-initial-gauss-radius)
* (calculate-glow-params)
> initial-opacity : 5
> final-opacity : 100
> final-gauss : 1
> final-spread : 2
> opacity-exponent : 0.4
> gauss-exponent : 2.2
> spread-exponent : 2.2
* (format-info)
* (process-layer)
* (calculate-glow-params)
> initial-opacity : 5
> final-opacity : 100
> final-gauss : 1
> final-spread : 2
> opacity-exponent : 0.4
> gauss-exponent : 2.2
> spread-exponent : 2.2
* (format-info)
* (process-layer)
* (calculate-glow-params)
> initial-opacity : 5
> final-opacity : 100
> final-gauss : 1
> final-spread : 2
> opacity-exponent : 0.4
> gauss-exponent : 2.2
> spread-exponent : 2.2
* (format-info)
* (process-layer)
> show-info : #f
> edit-paste glow-glow-stars
* (post-process)
> layer has alpha : glow-glow-stars
> layer has alpha : glow-glow-stars
> bbox of active selection: top-left (0,0) bottom-right (1960,1386)
* (end-plug-in)
> keep-construction : #f